Is your television set utter crap? Is your brother hogging the remote all day? Do you just prefer to be able to switch between your computer and Xbox 360 with ease? Then today is your lucky day, for I am going to show you how to play your Xbox 360 on a normal LCD computer monitor, this is my second how-to so hope you enjoy.
*Note: Depending on the hardware and extra capabilities of your computer and monitor that they may or may not have, these instructions AND prerequisites may differ from rig to rig.
First, let us make a checklist of the things you need in order to do this. You will need the following things:
- an Xbox 360 (no duh)
- an monitor that supports VGA
- speakers that have a 3.5mm jack (HERE is what 3.5mm jack looks like)
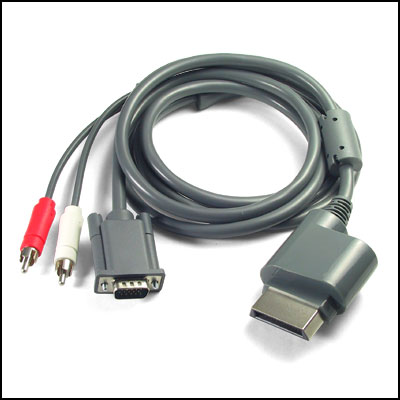
- Xbox 360 VGA HD AV cable EXMPLE (you can buy genuine ones at Best Buy for $50+, thought third party is much cheaper and works just the same)
- RCA to 3.5mm adapter EXAMPLE (I believe it comes with genuine VGA HD package, but not with the third party ones, can be bought for $1-$5 on eBay)
- 3.5mm to 3.5mm coupler EXAMPLE (easily found on eBay for $1-$5)
Some of the items up there may cause you quite a bit of trouble looking, I myself spent the a day or two looking for the coupler and RCA adapter. The HD VGA AV cable was amongst the first that I was able to find, Microsoft themselves actually released a genuine package themselves, and thus many PC owners pounced on the opportunity provided for them. However, the cable we not cheap, $50 or more at your local favourites like Best Buy. This is where third-parties stepped in. Japanese, Chinese, and even Korean companies started making their own versions at much cheaper prices! Ranging from $5-$25. They work just as well, but most of the time the boxing is in a different language, but do not fear, it works internationally. Though the genuine ones did come with a RCA adapter, the third-party ones only came with the cable, nothing more, nothing less. I highly suggest you get a third-party cable if you are on a low budget.
The RCA to 3.5mm adapter, and the 3.5mm coupler are both rare to find things, I went through a million electronics stores and could not locate one. I ended up buying them both off eBay for a total of $2. These things come in all shapes and sizes, so the example I showed above may not be the one you can locate. I did notice however that these mainly came from China or Hong Kong, but none the less, it works fine. Make SURE that you got ones that have 3.5mm jacks, the seller should describe it well, without the right sized jack, it won't work.
Also make sure that your monitor supports VGA, it HAS to support VGA or else it won't work (there is also a method with the HDMI cable for Xbox 360, but I have not tested and I may or may not post another guide with the HDMI as the main cable). My monitor has two slots, HDMI and VGA. My Xbox 360 takes up the VGA slot, while the computer takes the HDMI slot, so I can switch between the two with a touch of a button. You must ALSO make sure your speakers have 3.5mm jacks and not USB or any other plugs.
If you want to know exactly what I got, I bought a third-party HD VGA AV cable for $25 at a local electronics centre, and the RCA adapter and coupler are also third-party purchases from eBay. They work just as well as the genuine if not better at times.
Step 1

Step 2

Step 3

Plug the HD VGA AV cable into the Xbox 360.
Step 4

Connect the VGA end of the HD AV cable into the back of your monitor. Secure the screws so to prevent hiccups in the graphics. Notice the HDMI cable on the left of the HD AV cable, that is my computers output cable, so I can switch between the two sources anytime.
Step 5

Turning everything on
You have everything set up now, it is time for you to turn everything on! Monitor, speakers, and your Xbox 360! If you don't have your computer on and connected to your monitor at the same time, just turn on your monitor with your Xbox 360 on and BAM! You have your Xbox 360 on your screen! If you have your computer on, you will need to switch sources so just hit the Source button on the sides, bottom, or top of your monitor and KA-POW! You got your Xbox 360 on your screen. Now test out some games and make sure that volume works (I waited two weeks for my eBay items to arrive and didn't play the Xbox 360, no sound, no game). If it doesn't work retrace your steps, and try again. If it still doesn't work send a PM to my youtube page: www.youtube.com/Purenain
Make sure to check out my video if you love visuals more than text!
Common Technical Difficulties
1.When I am on the Xbox 360 source, there are two black bars on the bottom and top of my screen (or the sides), how do I fix this?
I'm not going to go in-depth about why this happens, just know that you can fix this by going into your System Settings on your Xbox 360, Console Settings, Display, Format, and select Wide Screen. Adjust the resolution if Wide Screen looks too awkward for you.
2. Audio for the console only comes out one speaker?
This is probably one of the most common problems even I myself experience, and there is no definitive way to solve it, even if you tamper with the Audio settings on the Xbox 360. I just ignore it, though I have read somewhere that this problem occurs with one of the three cables you buy. So it is just a matter of luck if you get a slightly-faulty one or not.
3. Sound is super low?
To fix this just turn your sound WAAAAAAAAAAAAAY up, but make sure you turn it back down once you plug it back into your computer, I don't want angry letters from your parents about how you went deaf because of my guide.
That's it folks! Hope you enjoyed this second guide I made. Please make sure to check out my video and thumbs up, comment, and of course, subscribe! Any comments or constructive criticism would be appreciated! Thanks again, and Purenain signing out.


